


Concentric Cycling
Mount for Specialized Saddle (SWAT compatible)
Mount for Specialized Saddle (SWAT compatible)
Couldn't load pickup availability
3D printed GoPro mount perfectly dimensioned for Specialized SWAT compatible saddles.
Available in 2 styles - with or without an Apple AirTag holder.
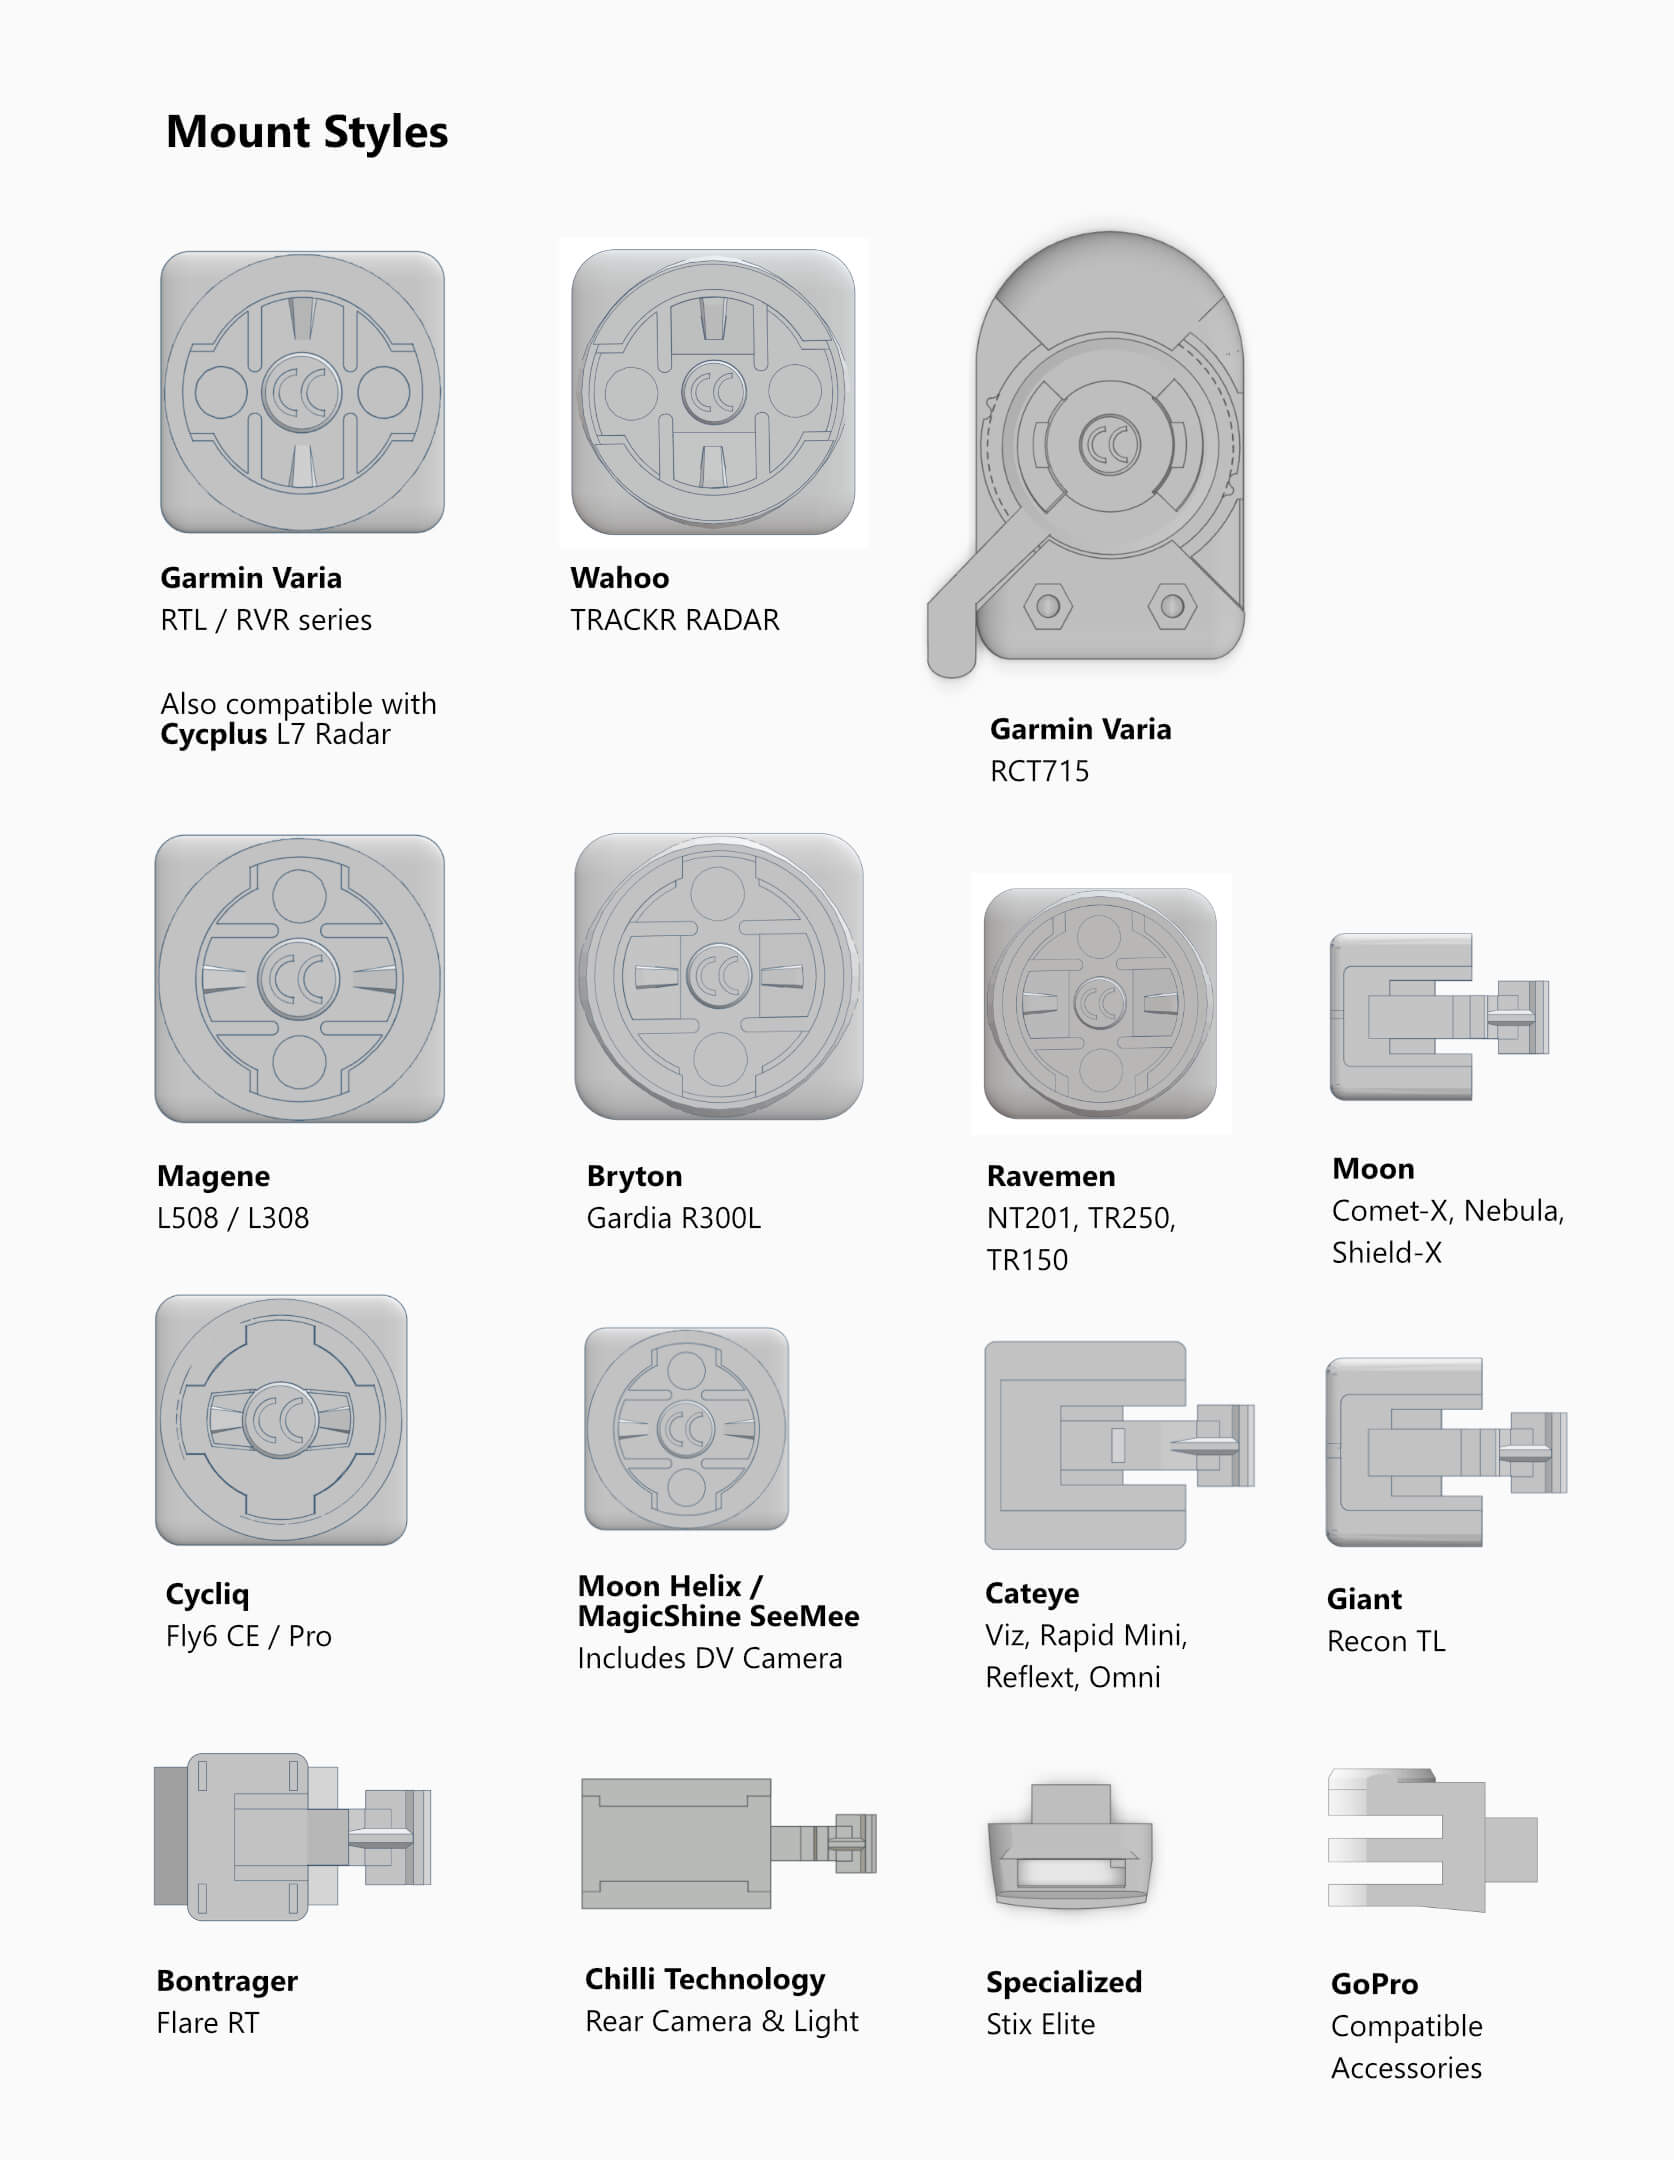
This mount can be combined with adaptors for any of the following:
- GoPro only
- Garmin Varia RTL/RVR Series
- Wahoo TRACKR RADAR
- Bryton Gardia R300L
- Magene L508/L308
- Garmin Varia RCT715
- Magene L508/L308
- Cycliq Fly6 CE/Pro
- Bontrager Flare RT / Trek CarBack
- Cateye (Viz, Rapid, Reflext and Omni)
- Giant Recon TL
- Moon (Comet-X Pro, Nebula, Shield-X)
- Moon Helix / MagicShine SeeMee (includes DV Camera)
- Ravemen (NT201 / TR250 / TR150)
- Specialized Stix Elite (Vertical)
- Specialized Stix Elite (Horizontal - image pending)
Our GoPro mounts and adaptors are positioned at the rear of the saddle so that small saddle bags can in most situations still be mounted under your saddle.
Manufactured in Australia from Carbon Nylon for strength, durability and heat/UV resistance. Supplied with the following blackened stainless steel fixings:
- 2 x 16mm M5 bolts (for saddle)
- 1 x 20mm M5 bolt (for GoPro mount)
- 1 x M5 All-metal lock-nut (for GoPro mount)
Replace the stock mount or rubber bands with a secure solution that is custom designed for your bike.
Shipping, Taxes & Returns
Shipping, Taxes & Returns
We ship most orders within 1 business day.
All orders are dispatched from Perth, Western Australia.
---------------------------------------------
International Shipping
Standard shipping rates by country as follows:
USA - $7 USD
Canada - $9 CAD
UK - £8 GBP
Europe - from €9 EUR (subject to location)
New Zealand - $7 AUD
Asia Pacific - $10 AUD
Rest of World - $15 AUD
Express shipping options also available from the cart.
Free standard shipping / discounted express shipping on orders over AU $100.
Import Duties and Sales Tax
Please note the following regarding import duties and sales taxes:
USA - the US has imposed a 10% baseline tariff, which took effect from 12:01AM on 5 April 2025 EDT. While it is currently unclear how this will be implemented, customers should expect that all items imported into the US will be subject to this tariff and that some delays may occur due to the additional time at US customs.
European Union - for orders up to 150 EUR, sales tax is included in the product price and import duties are waived. Orders over 150 EUR are without sales tax, which will need to be paid together with import duties on arrival into the EU.
UK - sales tax of 20% is included in the product price. Import duties apply to orders over 135 GBP and must be paid to Royal Mail on arrival into the UK.
Other countries - please refer to your local customs office for information on duties payable.
Concentric Cycling is not liable for local duties, taxes or losses that may arise from a customer refusing to pay the relevant duties on a purchase.
Shipping time from Australia in business days is as follows:
(For major cities delivery is usually on the lower end)
USA / UK / NZ
Standard - 5 to 15 days
Express - 3 to 8 days
Canada
Standard - 10 to 20 days
Express - 5 to 10 days
Asia Pacific
Standard - 10 to 20 days
Express - 4 to 8 days
Europe / Rest of World
Standard - 15 to 25 days
Express - 6 to 10 days
---------------------------------------------
Domestic Shipping (Australia)
Standard shipping - AU $5 flat rate
Express shipping - AU $10 flat rate
Free standard shipping / discounted express shipping on orders over AU $100.
Orders within Australia include GST.
Shipping time in business days is as follows:
(For major cities delivery is usually on the lower end)
Standard - 2 to 8 days
Express - 1 to 4 days
Care & Installation Instructions
Care & Installation Instructions
Care Instructions:
Carbon Nylon is a strong, durable and heat-resistant material; however, it can be worn down over time from unwanted abrasion. To ensure a long life for your mount, we recommend cleaning your bike light and mount after a wet and dirty ride. Particular attention should be given to remove any sand/grit from the interface between the mount and your light.
Our mounts are supplied with blackened stainless-steel fixings. Please use a good quality hex key when installing our mounts as worn or poor-quality tools may damage the hex interfaces. Do not combine our fixings with aluminium ones as these 2 metals corrode when placed together.
Installation Instructions:
To ensure a perfect fit of your Concentric Cycling product, please follow these recommended installation instructions:
Seat post mounts
1. Remove the bolt from the assembled mount using a 2.5mm hex key.
2. Carefully flex the seat clamp open and fit it around the seat post.
3. Position the seat clamp in the desired position (e.g. at the base of the seat post).
4. Pre-install the bolt into the seat clamp (drive-side of the bike).
5. Place the light mount into the opening and commence threading the bolt into place using a 2.5mm hex key.
6. Before threading the bolt through the other side of the seat clamp, ensure that the lock nut is in position and hold if required.
7. Slowly thread the bolt through the non-drive side of the seat clamp and into the lock nut until it is hand tight (max 1.5nm).
8. Do not over tighten or assemble at high speed as this may result in galling of the metal parts and/or damage to the lock nut.
Saddle mounts
1. If using an Apple AirTag model, place the AirTag into the base plate and pivot the cover plate into position starting from the clip side.
2. Position the mount below the mounting points on your saddle
3. Install the bolts through the mounting points and screw them into the saddle until hand tight (max 1.5nm).
4. Remove the M5 bolt from the GoPro mount, being careful not to drop the M5 lock nut.
5. Insert your chosen accessory or GoPro adaptor and reinstall the M5 bolt and lock nut until it is loosely in position.
6. Adjust the GoPro adaptor to your preferred angle.
7. Tighten the M5 bolt until it is hand tight (max 1.5nm).
8. Do not over tighten or assemble at high speed as this may result in galling of the metal parts and/or damage to the lock nut.
AirTag combo mounts
1. Install the combo mount as per the Seat post / Saddle mounts above.
2. Place your AirTag on the insert tray with the battery side facing down into the tray.
3. Insert the tray into the AirTag combo mount with the bottom of the tray facing the front of the bike.
4. Check that the retention clip is pressed in, to ensure the tray remains in place.
Front race plate mount
1. Using the included template, punch 4 new holes into the top edge of your race plate, making sure that the timing chip will not be damaged in the process.
2. Attach the front race plate to the GoPro attachment under your computer mount. Note that the bolt should be hand tight (max 1.5nm). If you want to be able to adjust the angle of your race place during your event, back off the tightness slightly.
3. Line up the race plate in front of the mount and insert the 2-pronged fixings through the front, making sure they are pushed all the way through.
4. Click in the locking mechanisms at the rear of the mount.
5. Adjust the angle of your race plate mount ensuring adequate clearance from your front wheel.
Rear race number holder / adaptor
1. Slide in the race number.
2. If required, mark on the race number your preferred new hole positions and add new holes with a hole punch. Once complete, reinsert your race number.
3. Insert the 2-pronged fixing through the race number and holder.
4. Click in the locking mechanism.
5. For adaptors, twist/slide the race number holder into your Concentric Cycling Seat Post Mount.
Computer mounts
Our computer mounts are supplied with a selection of stem bolts of different lengths. Selected computer mount models are also supplied with shims to allow for angle adjustment. Please select the relevant bolt length depending on whether shims or a GoPro attachment are used.
1. Thread the stem bolt into either the GoPro or Blank attachment.
2. Position the GoPro or Blank attachment into the computer mount.
3. Shims are included for Cervelo S5 or BMC ICS computer mounts. These will help to optimise the position and angle or your bike computer. Place a shim of your choice between the computer mount and the handlebar with the textured surfaces pressed together.
4. Screw the bolt into the front integrated fitting on your handlebar until loosely in position.
5. Position the rear bolt into the adjustable area and screw into the rear integrated fitting on your handlebar, again until loosely in position.
6. Tighten the bolts using a torque wrench to max 2.0nm.
7. If using the GoPro attachment, insert your chosen accessory and thread the bolt into the lock nut until it is hand tight (max 1.5nm).
8. Do not over tighten or assemble at high speed as this may result in galling of the metal parts and/or damage to the head unit mount and attachments.


Add another adaptor to your saddle mount
GoPro to Rear Light Adaptor
Share


